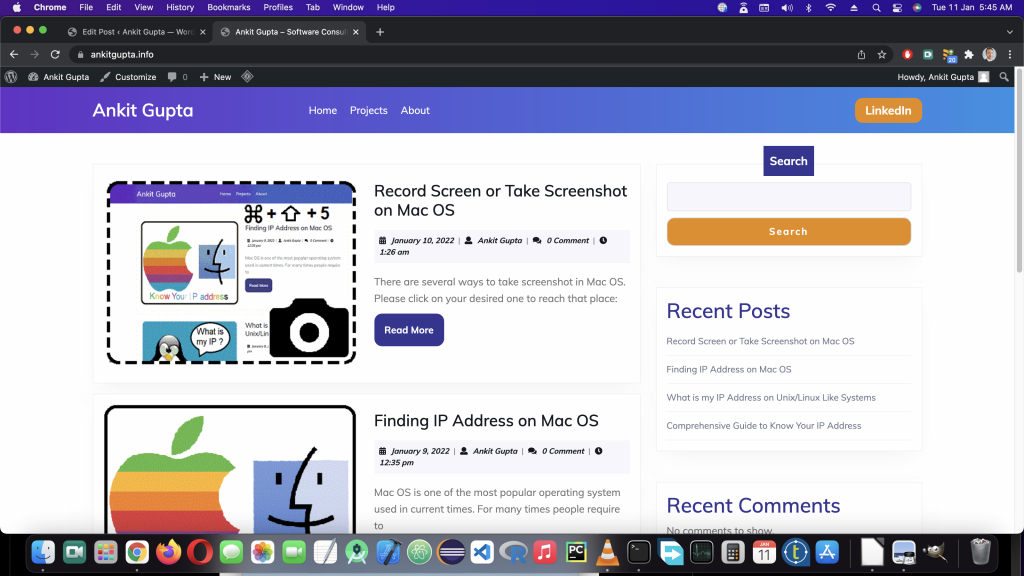
There are several ways to take screenshot in Mac OS. Please click on your desired one to reach that place:
- Take screenshot of full screen
- Take screenshot of selected area of screen
- Take screenshot of specific window
- Recording screen
If you want to take screenshot or record screenshot from ‘Terminal’ window, while executing other tasks as script please refer below blog:
Command Line Screen Recording or Screenshot from Mac OS Terminal
Quick Tip: Pressing ⌘ + ⬆ + 5 ( command + shift + 5 ) opens Screenshot app as floating panel. One can also open it through Launchpad -> Screenshot without using the shortcut.

| X | Full Screen | Window | Area Selector | Record Full Screen | Record Selected Area | Options | Action Button |
Take screenshot of full screen
Pressing ⌘ + ⬆ + 3 ( command + shift + 3 ) will take screenshot of full screen and show its preview as a floating window on lower right corner of screen. Clicking it will open Preview app through which one can edit the screenshot. If not clicked, the screenshot will get saved on Desktop (by default). Ctrl + ⌘ + ⬆ + 3 ( command + shift + 3 ) will neither show preview, nor save the screenshot but make the full screen picture available in clipboard for quick paste. The screenshot look like below:
Take screenshot of selected area of screen
Pressing ⌘ + ⬆ + 4 ( command + shift + 4 ) will convert the mouse pointer into a crosshair symbol. Then selected rectangular area with crosshair will be shown as preview as a floating window as lower right corner of screen and get saved as screenshot on Desktop (by default). Ctrl + ⌘ + ⬆ + 4 ( command + shift + 4 ) will open the crosshair which after selection will save the part of screen in clipboard for quick paste. The screenshot look like below:

Take screenshot of specific window
Pressing ⌘ + ⬆ + 4 ( command + shift + 4 ) then pressing Space will convert the mouse pointer into a camera symbol. Then selected window with camera symbol will be shown as preview as a floating window as lower right corner of screen and get saved as screenshot on Desktop (by default). Ctrl + ⌘ + ⬆ + 4 ( command + shift + 4 ) and pressing Space will show the camera symbol which after selection of a window will save the window screenshot in clipboard for quick paste. The screenshot look like below:
Recording screen
Pressing ⌘ + ⬆ + 5 ( command + shift + 5 ) will show following menu which has two buttons “Record Entire Screen” and “Record Selected Portion“.

On clicking Record Selected Portion one can adjust the screen area to be recorded. Then press “Record” button. The screenshot app will disappear from screen and screen will start getting recorded.
For stopping the recording press ⌘ + ⬆ + 5 ( command + shift + 5 ) again and click on “Stop Screen Recording” button. One can capture Screenshots while recording by clicking “Capture” button.

On stopping, the recording will be shown as floating preview on lower right corner of the screen, which is available for trimming if clicked, if not clicked it gets saved on Desktop (by default).
References:
https://www.idownloadblog.com/2014/07/29/how-to-take-screenshots-mac/#somescreen